PluginManager_v1.4.11_x64.zip


링크: https://support.microsoft.com/ko-kr/help/323246/how-to-upload-a-file-to-a-web-server-in-asp-net-by-using-visual-c-net

SSMS(SQL Server Management Studio) 다운로드

이 항목은 다음에 적용됩니다. 예SQL Server 예Azure SQL Database예Azure SQL Data Warehouse 아니요병렬 데이터 웨어하우스

SSMS는 SQL Server에서 SQL Database까지 모든 SQL 인프라를 관리하기 위한 통합 환경입니다. SSMS는 SQL의 인스턴스를 구성, 모니터링 및 관리하는 도구를 제공합니다. SSMS를 사용하면 응용 프로그램에 사용되는 데이터 계층 구성 요소를 배포, 모니터링 및 업그레이드하고 쿼리 및 스크립트를 작성할 수 있습니다.

로컬 컴퓨터 또는 클라우드 등 어디에서나 SSMS(SQL Server Management Studio)를 사용하여 데이터베이스 및 데이터 웨어하우스를 쿼리, 디자인 및 관리할 수 있습니다.

SSMS는 무료입니다.

SSMS 17.X는 SQL Server Management Studio의 최신 세대이며 SQL Server 2017을 지원합니다.

다운로드 SQL Server Management Studio 17.6 다운로드

다운로드 SQL Server Management Studio 17.6 업그레이드 패키지 다운로드(17.x에서 17.6으로 업그레이드)

경고

Maintenance Plans를 사용할 때 SSMS 17.6이 불안정해지고 크래시되는 알려진 문제가 있습니다. Maintenance Plans를 사용하는 경우에는 SSMS 17.6을 설치하지 마세요. 이미 17.6을 설치했고 이 문제가 발생할 경우 SSMS 17.5로 다운그레이드합니다.

버전 정보

릴리스 번호: 17.6
빌드 번호: 14.0.17230.0
릴리스 날짜: 2018년 3월 20일

SSMS 17.x 설치는 SSMS 16.x 이전 버전을 업그레이드 또는 대체하지 않습니다. SSMS 17.x는 이전 버전과 함께 설치되므로 두 버전을 모두 사용할 수 있습니다. 컴퓨터에 SSMS가 병렬로 설치되어 있으면 특정 요구에 맞는 올바른 버전을 시작해야 합니다. 최신 버전에는 Microsoft SQL Server Management Studio 17 레이블이 지정되며 새 아이콘이 추가됩니다.

SSMS 17.x

사용 가능한 언어

참고

영어 이외의 지역화된 SSMS 릴리스는 Windows 8, Windows 7, Windows Server 2012 및 Windows Server 2008 R2에 설치하는 경우 KB 2862966 보안 업데이트 패키지 가 필요합니다.

이 SSMS 릴리스는 다음 언어로 설치할 수 있습니다.

SQL Server Management Studio 17.6:
중국어(중국) | 중국어(대만) | 영어(미국) | 프랑스어 | 독일어 | 이탈리아어 | 일본어 | 한국어 | 포르투갈어(브라질) | 러시아어 | 스페인어

SQL Server Management Studio 17.6 업그레이드 패키지(17.x에서 17.6으로 업그레이드):
중국어(중국) | 중국어(대만) | 영어(미국) | 프랑스어 | 독일어 | 이탈리아어 | 일본어 | 한국어 | 포르투갈어(브라질) | 러시아어 | 스페인어

참고

SQL Server PowerShell 모듈은 이제 PowerShell 갤러리를 통해 별도로 설치됩니다. 자세한 내용은 SQL Server PowerShell 모듈 다운로드를 참조하세요.

SQL Server Management Studio

이 릴리스의 새로운 기능

SSMS 17.6은 최신 버전의 SQL Server Management Studio입니다. 17.X 세대의 SSMS는 SQL Server 2017을 통해 SQL Server 2008의 거의 모든 기능 영역을 지원합니다. 버전 17.x는 SQL Analysis Service PaaS도 지원합니다.

17.6 버전에는 다음이 포함됩니다.

일반 SSMS

SQL Database 관리되는 인스턴스:

  • Azure SQL Database 관리되는 인스턴스에 대한 지원을 추가했습니다. Azure SQL Database 관리되는 인스턴스(미리 보기)는 SQL Server 온-프레미스로 100%에 가까운 호환성, 일반적인 보안 문제를 해결하는 네이티브 VNet(가상 네트워크) 구현 및 온-프레미스 SQL Server 고객에 대한 편리한 비즈니스 모델을 제공하는 Azure SQL Database의 새로운 특성입니다.
  • 다음과 같은 일반적인 관리 시나리오에 대한 지원:
    • 데이터베이스 만들기 및 변경
    • 데이터베이스 백업 및 복원
    • 데이터 계층 응용 프로그램 가져오기, 내보내기, 추출 및 게시
    • 서버 속성 보기 및 변경
    • 전체 개체 탐색기 지원
    • 데이터베이스 개체 스크립팅
    • SQL 에이전트 작업에 대한 지원
    • 연결된 서버에 대한 지원
  • 여기에서 관리되는 인스턴스에 대해 자세히 알아봅니다.

개체 탐색기:

  • 개체 탐색기에서 쿼리 창으로 끌어다 놓을 때 이름 주변에 괄호를 적용하지 않도록 추가된 설정 (사용자 제안 32911933 및 32671051)

데이터 분류:

  • 일반 개선 사항 및 버그 수정

IS(Integration Services)

지원되는 SQL 서비스

  • 이 버전의 SSMS는 지원되는 모든 버전의 SQL Server 2008 - SQL Server 2017에서 작동하며 Azure SQL Database와 Azure SQL Data Warehouse의 최신 클라우드 기능 사용에 대해 최고 수준의 지원을 제공합니다.
  • SSMS 17.x를 사용하여 Linux의 SQL Server에 연결합니다.
  • 또한 SSMS 17.x는 SSMS 16.x 또는 SQL Server 2014 SSMS 및 이전 버전과 함께 설치할 수 있습니다.
  • SSIS(SQL Server Integration Services) - SSMS 버전 17.x는 레거시 SQL Server Integration Services 서비스에 대한 연결을 지원하지 않습니다.이전 버전의 레거시 Integration Services에 연결하려면 SQL Server의 버전과 정렬된 SSMS 버전을 사용합니다. 예를 들어 SSMS 16.x를 사용하여 레거시 SQL Server 2016 Integration Services 서비스에 연결합니다. SSMS 17.x 및 SSMS 16.x는 동일한 컴퓨터에 나란히 설치될 수 있습니다. SQL Server 2012 설치 이후 SSIS 카탈로그 데이터베이스인 SSISDB를 사용하여 Integration Services 패키지를 저장하고, 관리하고, 실행하고, 모니터링하는 것이 좋습니다. 자세한 내용은 SSIS 카탈로그를 참조하세요.

지원되는 운영 체제

이 SSMS 릴리스는 사용 가능한 최신 서비스 팩과 함께 사용할 경우 다음과 같은 64비트 플랫폼을 지원합니다.

  • Windows 10(64비트)
  • Windows 8.1(64비트)
  • Windows 8(64비트)
  • Windows 7(SP1)(64비트)
  • Windows Server 2016 *
  • Windows Server 2012 R2(64비트)
  • Windows Server 2012(64비트)
  • Windows Server 2008 R2(64비트)

* SSMS 17.X는 Windows Server 2016 이전에 출시된 Visual Studio 2015 격리 셸을 기반으로 합니다. Microsoft는 앱 호환성을 중요하게 생각하며 이미 제공된 응용 프로그램이 최신 Windows 버전에서 계속 실행되는지 확인합니다. Windows Server 2016에서 SSMS 실행 시 발생하는 문제를 최소화하려면 SSMS에 최신 업데이트가 모두 적용되어 있는지 확인합니다. Windows Server 2016에서 SSMS와 관련된 문제가 발생하는 경우 지원 센터로 문의하세요. 지원 팀에서는 문제가 SSMS, Visual Studio 또는 Windows 호환성과 관련이 있는지 확인합니다. 그런 후 해당 문제를 추가 조사를 위해 해당 팀으로 전송합니다.

SSMS 설치 팁 및 문제

설치 시 다시 부팅 최소화

  • SSMS 설치 프로그램에서 설치 후 다시 부팅하도록 요구할 가능성을 줄이려면 다음 작업을 수행합니다.
    • 최신 버전의 Visual C++ 2013 재배포 가능 패키지를 실행하고 있는지 확인합니다. 버전 12.0.40649.5 이상이 필요합니다. x64 버전만 필요합니다.
    • 컴퓨터의 .NET Framework 버전이 4.6.1 이상인지 확인합니다.
    • 컴퓨터에 열려 있는 다른 Visual Studio 인스턴스를 닫습니다.
    • 컴퓨터에 최신 OS 업데이트가 모두 설치되어 있는지 확인합니다.
    • 위에 언급한 작업은 일반적으로 한 번만 수행하면 됩니다. 동일한 주 버전의 SSMS로 추가 업그레이드를 수행하는 동안 다시 부팅해야 하는 몇 가지 경우가 있습니다. 부 버전 업그레이드의 경우 SSMS에 대한 모든 필수 조건이 컴퓨터에 이미 설치되어 있습니다.

릴리스 정보

다음은 이 17.6 릴리스의 문제 및 제한 사항입니다.

현재 유지 관리 계획에서 일정을 구성할 때 SSMS 17.6이 충돌하는 알려진 문제가 있습니다.

이전 릴리스

이전 SQL Server Management Studio 릴리스

피드백

needhelp_person_icon SQL 클라이언트 도구 포럼

info_tip 도움말 보기

참고 항목

콘텐츠 편집 SQL 설명서에 참여


I'm having problems finding a control (ToggleSwitch) inside my ListView. I have tried several approaches found here on SO or on other places around the web but none seems to be working.

Here is a the listView markup

<ListView Name="LampsListView" ItemsSource="{x:Bind Lamps}">
    <ListView.ItemTemplate>
        <DataTemplate x:DataType="models:Lamp">
            <StackPanel Name="StackPanel">
                <TextBlock Margin="10,0" Text="{Binding Name}" VerticalAlignment="Center" HorizontalAlignment="Left" />
                <ToggleSwitch Margin="10,0" HorizontalAlignment="Right" Name="LampToggleSwitch" IsOn="{x:Bind State, Converter={ StaticResource IntToIsOn}}" />
            </StackPanel>
        </DataTemplate>
    </ListView.ItemTemplate>
</ListView>

I have tried the ContainerFromItem but x will always be null.

 foreach (var item in this.LampsListView.Items)
 {
     var x = this.LampsListView.ContainerFromItem(item);
 }

And also the GetChildren approach but even thought GetChildren returns items it wont give me anything I can work with.

 private void FindMyStuff()
 {
     var ch = this.GetChildren(this.LampsListView);
 }

 private List<FrameworkElement> GetChildren(DependencyObject parent)
 {
     List<FrameworkElement> controls = new List<FrameworkElement>();

     for (int i = 0; i < VisualTreeHelper.GetChildrenCount(parent); ++i)
     {
         var child = VisualTreeHelper.GetChild(parent, i);
         if (child is FrameworkElement)
         {
             controls.Add(child as FrameworkElement);
         }
         controls.AddRange(this.GetChildren(child));
     }
     return controls;
}

And I've tried booth finding the StackPanel and go straight for the LampToggleSwitch.

The FindMyStuff() is called right after i've updated the ObservableCollection that is bound to the ListView and the update is done from a this.Dispatcher.RunAsync(). I don't know if this has anything to do with it thought.

Could someone please tell me what I'm doing wrong?

Generally traversing visual tree or getting items by names/types is in most cases a wrong way of doing thigs, much better would be to implement apropriate binding.

Nevertheless if you want to do this, you are almost there. As I've tried it should work like this:

var listViewItem = this.mylist.ContainerFromItem(mylist.Items.First()) as ListViewItem;
var itemsStackPanel = listViewItem.ContentTemplateRoot as StackPanel;
var myToggleSwitch = itemsStackPanel.Children.FirstOrDefault(x => x is ToggleSwitch);
// other way with your helper
var childByHelper = GetChildren(listViewItem).FirstOrDefault(x => x is ToggleSwitch);

Just watch out when you run this, if it's done before list is populated, listVieItems will be null.


게시 날짜: 2016년 4월

Visual Studio 2017 에 대한 최신 설명서는 Visual Studio 2017 설명서를 참조하세요.

C#에서 편집하며 계속하기를 사용하면 디버깅하는 동안 중단 모드에서 코드를 변경할 수 있습니다. 디버깅 세션을 중지하고 다시 시작하지 않고도 변경 내용을 적용할 수 있습니다.

편집하며 계속하기는 중단 모드에서 필요한 내용을 변경한 다음 계속단계 또는 다음 문 설정 같은 디버거 실행 명령을 선택하거나 디버거 창에서 함수를 실행하는 경우에 자동으로 호출됩니다.

System_CAPS_ICON_note.jpg 참고

Compact Framework, 최적화된 코드, 혼합된 네이티브/관리 코드 또는 SQL Server CLR(공용 언어 런타임) 통합 코드를 디버깅할 때는 편집과 계속하기가 지원되지 않습니다. 이러한 시나리오 중 하나에서 코드 변경 내용을 적용하려고 하면 디버거에서 편집하며 계속하기가 지원되지 않는다는 대화 상자를 표시합니다.

편집하며 계속하기를 자동으로 호출하려면

  1. 중단 모드에서 소스 코드를 변경합니다.

  2. 디버그 메뉴에서 계속단계 또는 다음 문 설정을 클릭하거나 디버거 창에서 함수를 실행합니다.

    새 코드가 컴파일되고 새 코드를 사용하여 디버깅이 계속 진행됩니다. 일부 변경 사항은 편집하며 계속하기에서 지원되지 않습니다. 자세한 내용은 지원되는 코드 변경(C#)을 참조하십시오.

편집하며 계속하기를 사용하거나 사용하지 않도록 설정하려면

  1. 도구 메뉴에서 옵션을 클릭합니다.

  2. 옵션 대화 상자에서 디버깅 노드를 확장하고 편집하며 계속하기를 선택합니다.

  3. 옵션 대화 상자의 편집하며 계속하기 페이지에서 편집하며 계속하기 사용 확인란을 선택하거나 선택 해제합니다.

    디버깅 세션을 다시 시작하면 설정 사항이 적용됩니다.


Visual Studio에서 원격 컴퓨터 UWP 앱 실행

UWP 앱에서 원격 컴퓨터를 실행 하려면 Visual Studio 용 원격 도구를 사용 하 여 연결 해야 합니다. 원격 도구를 사용 하 여 실행, 디버깅, 프로 파일링 및 Visual Studio를 실행 하는 다른 컴퓨터에서 한 장치에서 실행 되는 UWP 앱을 테스트할 수 있습니다. 원격 장치에서 실행 되는 Visual Studio 컴퓨터에서 터치, 지리적 위치 및 실제 방향 등의 UWP 앱에 관련 된 기능을 지원 하지 않을 때 특히 효과적일 수 있습니다. 이 항목에서는 원격 세션을 구성하고 시작하는 절차에 대해 설명합니다.

일부 시나리오에서는 원격 장치에 배포할 때에 자동으로 원격 도구 설치 됩니다.

  • Windows 10 Pc 작성자 업데이트 및 이상 버전을 실행, 용 원격 도구를 자동으로 설치 됩니다.
  • Windows 10 Xbox, IOT 및 HoloLens 장치에 대 한 원격 도구를 자동으로 설치 됩니다.
  • Windows 10 Mobile phone에 물리적으로 연결 해야, 사용 하도록 설정 해야 개발자 모드 선택 해야 장치 디버그 대상으로 합니다. 원격 도구 필요 하거나 지원 하지 합니다.

Windows 10 Pc의 Windows 사전-작성자의 업데이트 버전을 실행 합니다 설치 해야 원격 도구 원격 컴퓨터에 수동으로 디버그할 수 있습니다. 이 항목의 지침을 따릅니다.

필수 구성 요소

원격 장치에서 디버깅하려면

  • 원격 장치와 Visual Studio 컴퓨터를 네트워크를 통해 연결 하거나 USB 또는 이더넷 케이블을 통해 직접 연결 해야 합니다. 인터넷을 통한 디버깅은 지원되지 않습니다.

  • 사용 하도록 설정 해야 개발자 모드합니다.

  • Windows 10 Pc를 Windows 10 작성자의 업데이트 보다 이전 버전의 Windows 10 실행을 사용 해야 설치 하 고 원격 디버깅 구성 요소 실행합니다.

보안

기본적으로 유니버설 (암호화 되지 않은 프로토콜) Windows 10에서 사용 됩니다. 이 프로토콜은 신뢰할 수 있는 네트워크만 사용 해야 합니다.디버깅 연결이 악의적인 사용자가 가로채 고 개발 및 원격 컴퓨터 사이 전달 되는 데이터를 변경할 수에 취약 합니다.

경고

인증 모드를 설정 하면 네트워크 보안이 없습니다 없는 유니버설 (암호화 되지 않은 프로토콜) 또는 None합니다. 네트워크를 악의적인 트래픽이나 유해 트래픽에서 위험이 없는 경우에 이러한 모드를 선택 합니다.

USB 케이블을 사용 하 여 직접 연결 하는 방법

Windows 10에서 배포할 수 있습니다는 USB로 연결 된 장치를 선택 하 여 장치 대신 원격 컴퓨터 배포 대상으로 (에서 수행할 수 있습니다는 표준도구 모음 또는 디버깅 속성 페이지에서).

원격 디버깅을 위해 Visual Studio 프로젝트 구성

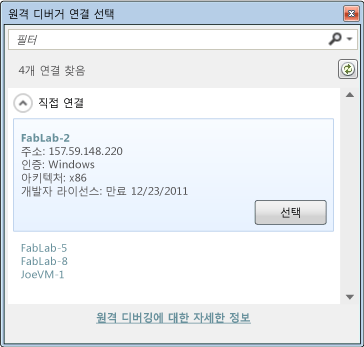
프로젝트 속성에서 연결할 원격 장치를 지정합니다. 절차는 프로그래밍 언어에 따라 다릅니다. 원격 장치의 네트워크 이름을 입력 하거나에서 선택할 수는 원격 연결 대화 상자.

원격 디버거 연결 대화 상자 선택

이 대화 상자에는 Visual Studio 컴퓨터의 로컬 서브넷에 있으며 원격 디버거를 실행 중인 장치만 나열됩니다.

원격 장치에 연결하는 데 문제가 있을 경우 장치의 IP 주소를 입력해 보십시오. 장치의 IP 주소를 확인하려면 명령 창을 연 다음 ipconfig를 입력합니다. 그러면 IP 주소가 IPv4 Address로 나열됩니다.

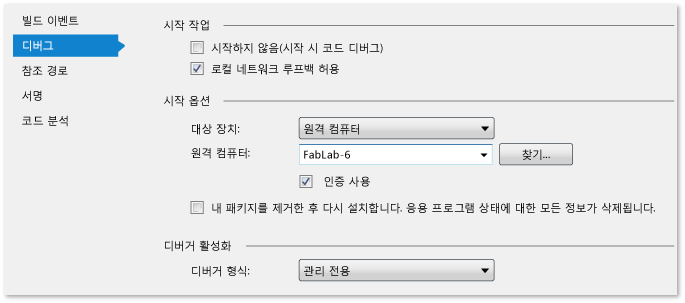
C# 및 Visual Basic 프로젝트에 사용할 원격 장치 선택

  1. 솔루션 탐색기에서 프로젝트 이름을 선택한 다음 바로 가기 메뉴에서 속성 을 선택합니다.

  2. 디버그를 선택합니다.

  3. 대상 장치 목록에서 원격 컴퓨터 를 선택합니다.

  4. 원격 컴퓨터 상자에 원격 장치의 네트워크 이름을 입력하거나 찾기 를 선택하여 원격 디버거 연결 선택 대화 상자에서 장치를 선택합니다.

    원격 디버깅에 대 한 프로젝트 속성을 관리 되는

JavaScript 및 c + + 프로젝트에 사용할 원격 장치 선택

  1. 솔루션 탐색기에서 프로젝트 이름을 선택한 다음 바로 가기 메뉴에서 속성 을 선택합니다.

  2. 구성 속성 노드를 확장한 다음 디버깅을 선택합니다.

  3. 실행할 디버거 목록에서 원격 디버거 를 선택합니다.

  4. 컴퓨터 이름 상자에 원격 장치의 네트워크 이름을 입력하거나 해당 상자에서 아래쪽 화살표를 선택하여 원격 디버거 연결 선택 대화 상자에서 장치를 선택합니다.

    C+ + 프로젝트 원격 디버깅에 대 한 속성

원격 도구 다운로드 및 설치 (사전 작성자 업데이트)

이전 작성자의 업데이트 버전의 Windows 10을 사용 하는 경우 이러한 지침을 따릅니다. 그렇지 않으면이 섹션을 건너뛸 수 있습니다.

  1. 장치 또는 서버 디버깅 하려는 컴퓨터 (을 하지 않고 Visual Studio를 실행 하는 컴퓨터)에서 올바른 버전을의 원격 도구를 가져옵니다.

    버전링크노트
    Visual Studio 2017 (최신 버전)원격 도구항상 장치 운영 체제 (x86 또는 x64)를 일치 하는 버전을 다운로드 합니다. 향상 된 보안 모드 설정 (Windows Server) 메시지가 표시 되 면 새 신뢰할 수 있는 사이트 추가 해야 합니다.
    Visual Studio 2017 (구)원격 도구Visual Studio 2017의 이전 릴리스에 대 한 원격 도구가 My.VisualStudio.com에서 제공 됩니다. 메시지가 표시 되 면 조인 무료 Visual Studio Dev Essentials 그룹 또는 Visual Studio 구독을 사용 하 여 로그인 id입니다. 향상 된 보안 모드 설정 (Windows Server) 메시지가 표시 되 면 새 신뢰할 수 있는 사이트 추가 해야 합니다.
    Visual Studio 2015 업데이트 3원격 도구메시지가 표시 되 면 조인 무료 Visual Studio Dev Essentials 그룹 또는 Visual Studio 구독을 사용 하 여 로그인 id입니다. 향상 된 보안 모드 설정 (Windows Server) 메시지가 표시 되 면 새 신뢰할 수 있는 사이트 추가 해야 합니다.
    Visual Studio 2015 (구)원격 도구메시지가 표시 되 면 조인 무료 Visual Studio Dev Essentials 그룹 또는 Visual Studio 구독을 사용 하 여 로그인 id입니다. 향상 된 보안 모드 설정 (Windows Server) 메시지가 표시 되 면 새 신뢰할 수 있는 사이트 추가 해야 합니다.
    Visual Studio 2013원격 도구Visual Studio 2013 설명서에서 페이지를 다운로드 합니다.
    Visual Studio 2012원격 도구Visual Studio 2012 설명서에서 페이지를 다운로드 합니다.
  2. 다운로드 페이지에서 운영 체제 (x 86, x64 또는 ARM)와 일치 하는 버전의 도구를 선택 하 고 원격 도구를 다운로드 합니다.

    중요

    Visual Studio 버전에 일치 하는 가장 최신 버전의 원격 도구를 설치 하는 것이 좋습니다. 버전이 일치 하지 않는 권장 되지 않습니다. 또한 설치 하려는 운영 체제와 동일한 아키텍처가 있는 원격 도구를 설치 해야 합니다. 즉, 64 비트 운영 체제를 실행 하는 원격 컴퓨터에서 32 비트 응용 프로그램을 디버깅 하려면 원격 컴퓨터에서 64 비트 버전의 원격 도구를 설치 해야 합니다.

    화면 3 x64 ARM에서 전환 아키텍처. ARM 버전의 원격 도구에 대 한 Visual Studio 2017 ´ ù. Visual Studio 2015에 대 한 Visual Studio 2015 RTW 다운로드에 ARM 버전을 찾습니다.

  3. 실행 파일을 다운로드 했으면 다음 섹션으로 이동 하 고 설치 지침을 따릅니다.

원격 컴퓨터에 원격 디버거 (msvsmon.exe)를 복사 하 고 실행 하려고 하는 경우 주의 해야 하는 원격 디버거 구성 마법사 (rdbgwiz.exe) 다운로드 하는 경우에 설치 되는 도구입니다. 특히 원격 디버거가 서비스로 실행 되도록 하는 경우 나중에 구성에 대 한 마법사를 사용 해야 합니다. 자세한 내용은 참조 구성 (선택 사항) 원격 디버거를 서비스로합니다.

원격 디버거 설정

원격 컴퓨터에 관리 권한이 있어야 합니다.

  1. 원격 디버거 응용 프로그램을 찾습니다. (이 설치 되어 있는, 위치에 msvsmon.exe를 찾거나 여 시작 메뉴 및 검색에 대 한 열 원격 디버거.)

    원격 서버에 원격 디버거를 실행 하는 경우 원격 디버거 응용 프로그램을 마우스 오른쪽 단추로 클릭 하 고 선택할 수 관리자 권한으로 실행합니다. 원격 서버에서 실행 되지 않는 경우 바로 정상적으로 시작 합니다.

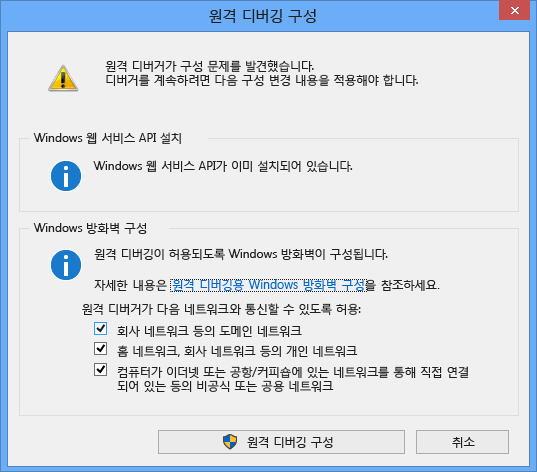
  2. 처음으로 (또는 구성 하기 전에) 원격 도구를 시작 하 고, 원격 디버깅 구성 대화 상자가 나타납니다.

    RemoteDebuggerConfWizardPage

  3. Windows 서비스 API (Windows Server 2008 r 2 에서만 발생 함)는 설치 되지 않은 경우 선택 된 설치 단추입니다.

  4. 원격 도구를 사용하려는 네트워크 종류를 선택합니다. 하나 이상의 네트워크 형식을 선택해야 합니다. 컴퓨터가 도메인을 통해 연결된 경우 첫 번째 항목을 선택해야 합니다. 컴퓨터가 작업 그룹 또는 홈 그룹을 통해 연결된 경우 두 번째 또는 세 번째 항목을 적절하게 선택해야 합니다.

  5. 선택 원격 디버깅 구성 방화벽을 구성 하 고 도구를 시작 합니다.

  6. 구성이 완료되면 원격 디버거 창이 나타납니다.

    RemoteDebuggerWindow

    이제 원격 디버거를 연결을 기다리고 있습니다. 서버 이름의 기록 하 고 나중에 Visual Studio에서 사용 하는 구성와 일치 해야 하기 때문에 포트 표시 되는 번호입니다.

    디버깅 및 원격 디버거를 중지 해야 할 완료 되 면 클릭 파일 > 종료 창에 있습니다. 다시 시작할 수 있습니다는 시작 메뉴 또는 명령줄에서:

    <Visual Studio 설치 디렉터리 > \Common7\IDE\Remote 디버거\< x86, x64 또는 Appx > \msvsmon.exe합니다.

원격 디버깅 세션 시작

로컬 세션의 경우와 같은 방법으로 원격 디버그 세션을 시작, 중지, 탐색할 수 있습니다. Pre-작성자의 업데이트 버전의 Windows 10에서 원격 장치에서 원격 디버깅 모니터가 실행 되 고 있는지 확인 합니다.

그런 다음 디버그 메뉴에서 디버깅 시작 을 선택합니다(키보드: F5). 프로젝트가 다시 컴파일된 다음 원격 장치에 배포되어 시작됩니다. 디버거는 중단점에서 실행을 일시 중단하며 사용자는 한 단계씩 코드를 실행하거나, 프로시저 단위로 실행하거나 코드를 종료하여 한 번에 한 줄씩 실행할 수 있습니다. 디버깅 중지 를 선택하여 디버그 세션을 끝내고 원격 응용 프로그램을 종료할 수 있습니다.

참고 항목

고급 원격 배포 옵션
Visual Studio로 UWP 앱 테스트 
Visual Studio에서 앱 디버깅


c# .net sftp 연동  C# / Language 

2015. 5. 12. 17:12

복사https://blog.naver.com/marnet/220357383255

번역하기 전용뷰어 보기

첨부파일 (3)

C#.NET FTP 파일 동기화 에이전트를 만드는 데 SFTP도 지원을 해주기로 함.


.NET에서는 기본적으로 SFTP는 지원을 하지 않는다고 한다.


그래서 서드파티 모듈을 써야 하는 데 구글링해보니 여러 가지가 있다. 


그 중 SharpSSH가 사장 사용하기 쉽고 접근성이 높은 거 같아 사용하기로 함.


SharpSSH 라이브러리는 아래의 주소에서 다운로드 받을 수 있다.


http://sourceforge.net/projects/sharpssh/


라이브러리는 다운 받고 진행 중인 프로젝트에 Tamir.SharpSSH.dll 파일을 참조하고 import 해준다.
 

다운로드, 업로드, 리스트 가져오기 소스 코드는 다음과 같다.


리스트 가져오기
1
2
3
4
5
6
7
8
9
string _ftpURL = "testsftp.com"//Host URL or address of the SFTP server
string _UserName = "admin";     //User Name of the SFTP server
string _Password = "admin123";  //Password of the SFTP server
int _Port = 22;                 //Port No of the SFTP server (if any)
string _ftpDirectory = "Receipts"//The directory in SFTP server where the files are present
Sftp oSftp = new Sftp(_ftpURL, _UserName, _Password);
oSftp.Connect(_Port);
ArrayList FileList = oSftp.GetFileList(_ftpDirectory);
oSftp.Close();


다운로드
1
2
3
4
5
6
7
8
9
10
11
12
13
14
15
16
17
18
19
20
21
22
23
string _ftpURL = "testsftp.com"//Host URL or address of the SFTP server
string _UserName = "admin";     //User Name of the SFTP server
string _Password = "admin123";  //Password of the SFTP server
int _Port = 22;                 //Port No of the SFTP server (if any)
string _ftpDirectory = "Receipts"//The directory in SFTP server where the files are present
string LocalDirectory = "D:\\FilePuller"//Local directory where the files will be downloaded
 
Sftp oSftp = new Sftp(_ftpURL, _UserName, _Password);
oSftp.Connect(_Port);
ArrayList FileList = oSftp.GetFileList(_ftpDirectory);
FileList.Remove(".");
FileList.Remove("..");        //Remove . from the file list
FileList.Remove("Processed"); //Remove folder name from the file list. If there is no folder name remove the code.
 
for (int i = 0; i < FileList.Count; i++)
{
    if (!File.Exists(LocalDirectory + "/" + FileList[i]))
    {
        oSftp.Get(_ftpDirectory + "/" + FileList[i], LocalDirectory + "/" + FileList[i]);
        Thread.Sleep(100);
    }
}
oSftp.Close();


업로드

1
2
3
4
5
6
7
8
9
10
11
12
string _ftpURL = "testsftp.com"//Host URL or address of the SFTP server
string _UserName = "admin";      //User Name of the SFTP server
string _Password = "admin123";   //Password of the SFTP server
int _Port = 22;                  //Port No of the SFTP server (if any)
string _ftpDirectory = "Receipts"//The directory in SFTP server where the files will be uploaded
string LocalDirectory = "D:\\FilePuller"//Local directory from where the files will be uploaded
string FileName = "test.txt";    //File name, which one will be uploaded
 
Sftp oSftp = new Sftp(_ftpURL, _UserName, _Password);
oSftp.Connect(_Port);
oSftp.Put(LocalDirectory + "/" + FileName, _ftpDirectory + "/" + FileName);
oSftp.Close()


참고

http://www.codeproject.com/Questions/544479/C-plussftpplusdownloadplusandplusupload

http://cybarlab.com/download-upload-files-from-sftp-server-in-c-sharp

[출처] c# .net sftp 연동|작성자 주용준


AWS Developer Blog

Using AWS KMS Master Keys with the AmazonS3EncryptionClient in the AWS SDK for .NET

You can now use an AWS KMS key as your master key when you use the AmazonS3EncryptionClient class for client-side encryption.

The main advantage of using an AWS KMS key as your master key is that you don’t need to store and manage your own master keys. It’s done by AWS. A second advantage of the new feature is that it makes the AWS SDK for .NET’s AmazonS3EncryptionClient class interoperable with the AWS SDK for Java’s AmazonS3EncryptionClient class.* This means you can encrypt with the AWS SDK for Java and decrypt with the AWS SDK for .NET, and vice versa.

For more information about client-side encryption with the AmazonS3EncryptionClient class, and how envelope encryption works, see our original blog post.

The following examples demonstrate how to use AWS KMS keys with the AmazonS3EncryptionClient class. Note that your project must reference the latest version of the AWSSDK.KeyManagementService Nuget package to use this feature.

// Encryption
// ----------
var bucketName = "bucket";
var kmsKeyID = "kms-key-id";
var objectKey = "key";
var objectContent = "object content";

var kmsEncryptionMaterials = new EncryptionMaterials(kmsKeyID);
// CryptoStorageMode.ObjectMetadata is required for KMS EncryptionMaterials
var config = new AmazonS3CryptoConfiguration()
{
    StorageMode = CryptoStorageMode.ObjectMetadata
};

using (var client = new AmazonS3EncryptionClient(config, kmsEncryptionMaterials))
{
    var request = new PutObjectRequest
    {
        BucketName = bucketName,
        Key = objectKey,
        ContentBody = objectContent
    };
    client.PutObject(request);
}

// Decryption
// ----------
var bucketName = "bucket";
var kmsKeyID = "kms-key-id";
var objectKey = "key";
string objectContent = null;

var kmsEncryptionMaterials = new EncryptionMaterials(kmsKeyID);
// CryptoStorageMode.ObjectMetadata is required for KMS EncryptionMaterials
var config = new AmazonS3CryptoConfiguration()
{
    StorageMode = CryptoStorageMode.ObjectMetadata
};

using (var client = new AmazonS3EncryptionClient(config, kmsEncryptionMaterials))
{
    var request = new GetObjectRequest
    {
        BucketName = bucketName,
        Key = objectKey
    };

    using (var response = client.GetObject(request))
    using (var stream = response.ResponseStream)
    using (var reader = new StreamReader(stream))
    {
        objectContent = reader.ReadToEnd();
    }
}
// use objectContent

*The AWS SDK for .NET’s AmazonS3EncryptionClient only supports KMS master keys when run in metadata mode. The instruction file mode of the AWS SDK for .NET’s AmazonS3EncryptionClient is still incompatible with the AWS SDK for Java’s AmazonS3EncryptionClient.


AWS KMS를 이용한 암호화 API 구축하기

서버 없이 쉽고 빠르게 암복호화 API서비스를 만들어 봅니다.

지난해 우아한형제들은 정보보호관리체계(ISMS)인증 심사를 준비하며 개인정보 암호화 키를 물리적으로 분리하여 보다 안전하게 관리할 수 있는 AWS Key Management Service(이하 KMS) 도입을 결정했습니다. 그리고 운영 리소스를 최소화하고 트래픽에 유연하게 대처하기 위해 AWS 서버리스 서비스들을 적극적으로 활용하여 암복호화 API를 구현했습니다. API 서비스를 구축함에 있어 인프라 이슈를 배제하고 로직에 집중할 수 있다는 건 행복한 일이니까요 :)

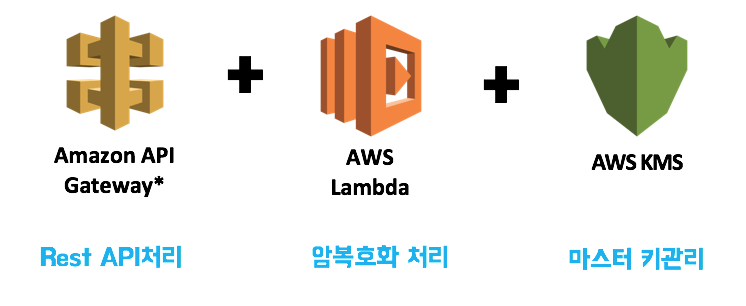
암복호화 API 서비스를 만들기 위해서는 라우터 역할을 할 AWS API Gateway와 함수 실행을 위한 AWS Lambda 그리고 키 관리를 위한 KMS가 필요한데, 각 서비스들의 주요 기능과 장단점에 대한 설명은 생략하는 걸로…

Serverless 서비스들

잠깐!!! API 서비스 구축에 앞서,

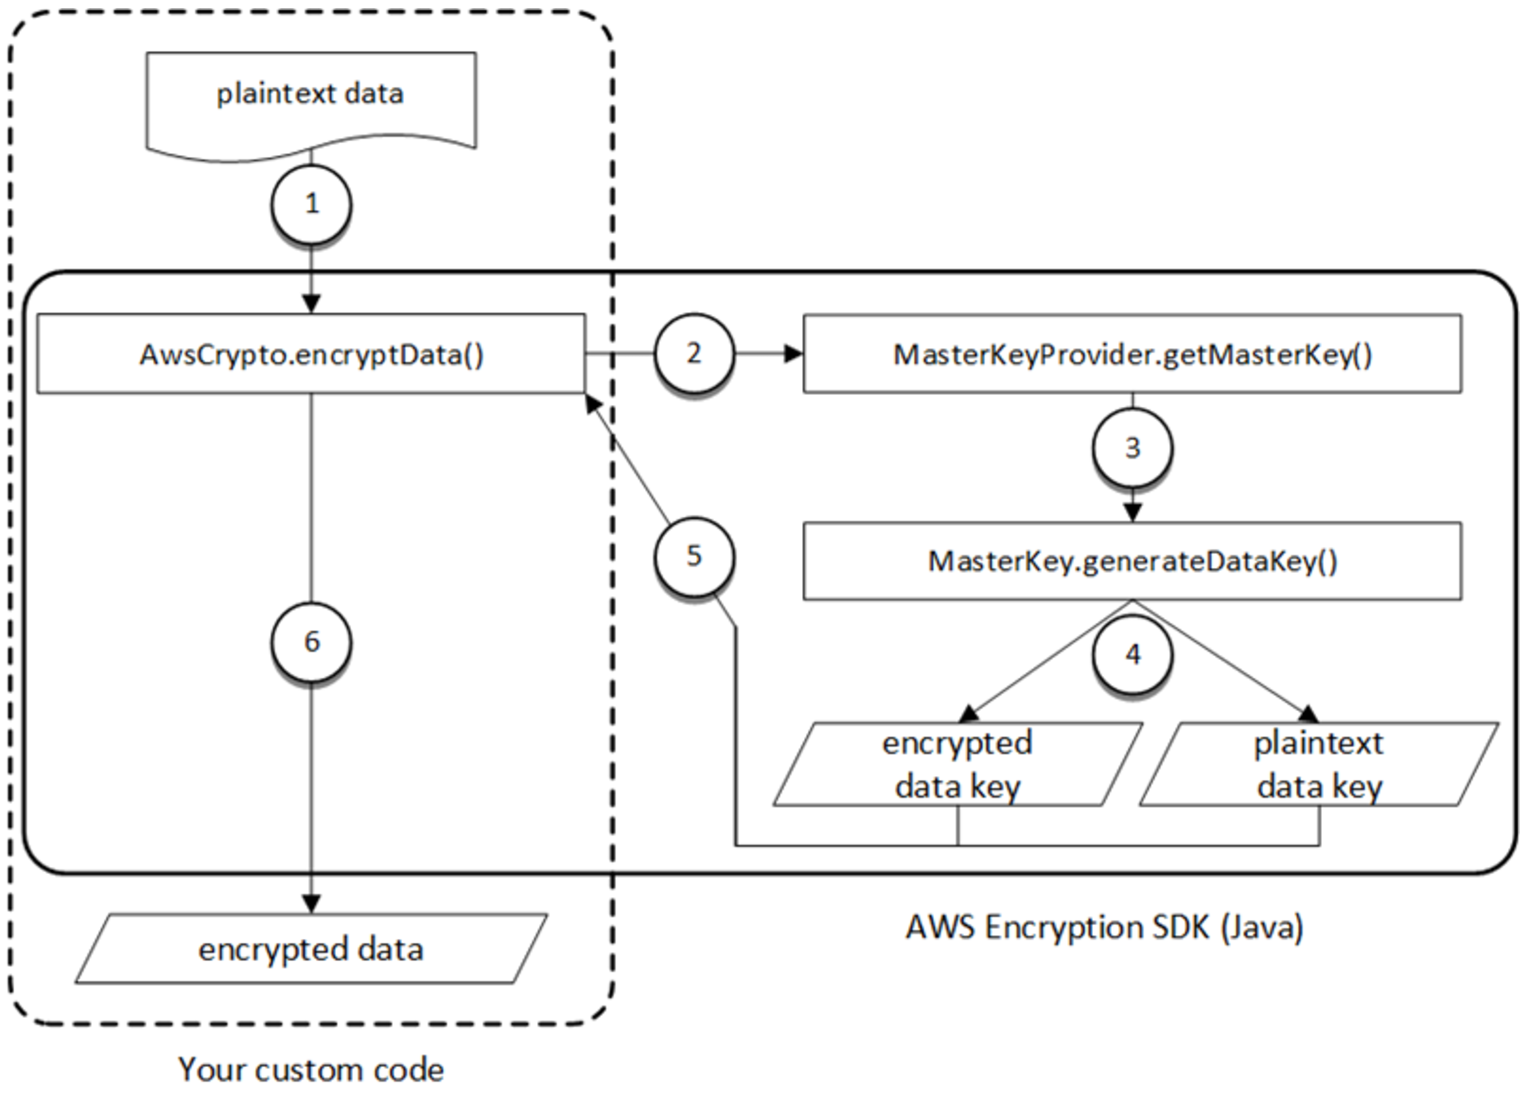
Customer Master Keys (CMKs)를 가지고 직접 암복호화를 수행하는 것에 따른 보안 위험성과 이 때 발생하는 네트워크 로드를 줄이기 위해 봉투 암호화(Envelope Encryption) 방식을 사용하여 데이터 보안을 확보하고 Data Keys(DKs) 요청에만 네트워크 비용이 발생하도록 하는 것이 좋습니다. 이 때 사용되는 Key들과 AWS Encryption SDK에서 제시하는 암복호화 프로세스에 대해 간단하게 설명하겠습니다.

KMS Keys

  • Master Key
    Region별로 생성 가능하며 AWS에 의해 보관 관리되고 키값이 노출되지 않습니다. 어플리케이션에서는 암복호화를 위해 KEY ID값을 받급 받아 사용합니다.
  • 평문 Data key
    AWS에 의해 발급되며 암복호화 시 꼭 필요한 Key값이지만, 해당 시점에만 사용하고 별도로 보관해서는 안됩니다.
  • 암호화된 Data key
    평문 Data Key를 암호화한 Key값으로 복호화 시 평문 Key를 얻기 위해 사용합니다.

암호화 방식

Encryption

  1. 암호화를 위한 평문을 암호화 메소드에 전달합니다.
  2. Master key Provider를 통해 사용할 Master Key를 결정합니다.
  3. Master Key를 이용하여 Data Key를 생성합니다.
  4. 이때, 평문과 암호화된 2개의 Data Key가 생성됩니다.
  5. 평문 Data Key를 이용하여 평문을 암호화합니다. 암호화가 완료되면 평문 Data Key는 삭제합니다.
  6. 암호화된 문자열과 암호화된 Data Key를 반환합니다. 암호화된 Data Key는 복호화를 위해 필요한 정보입니다.

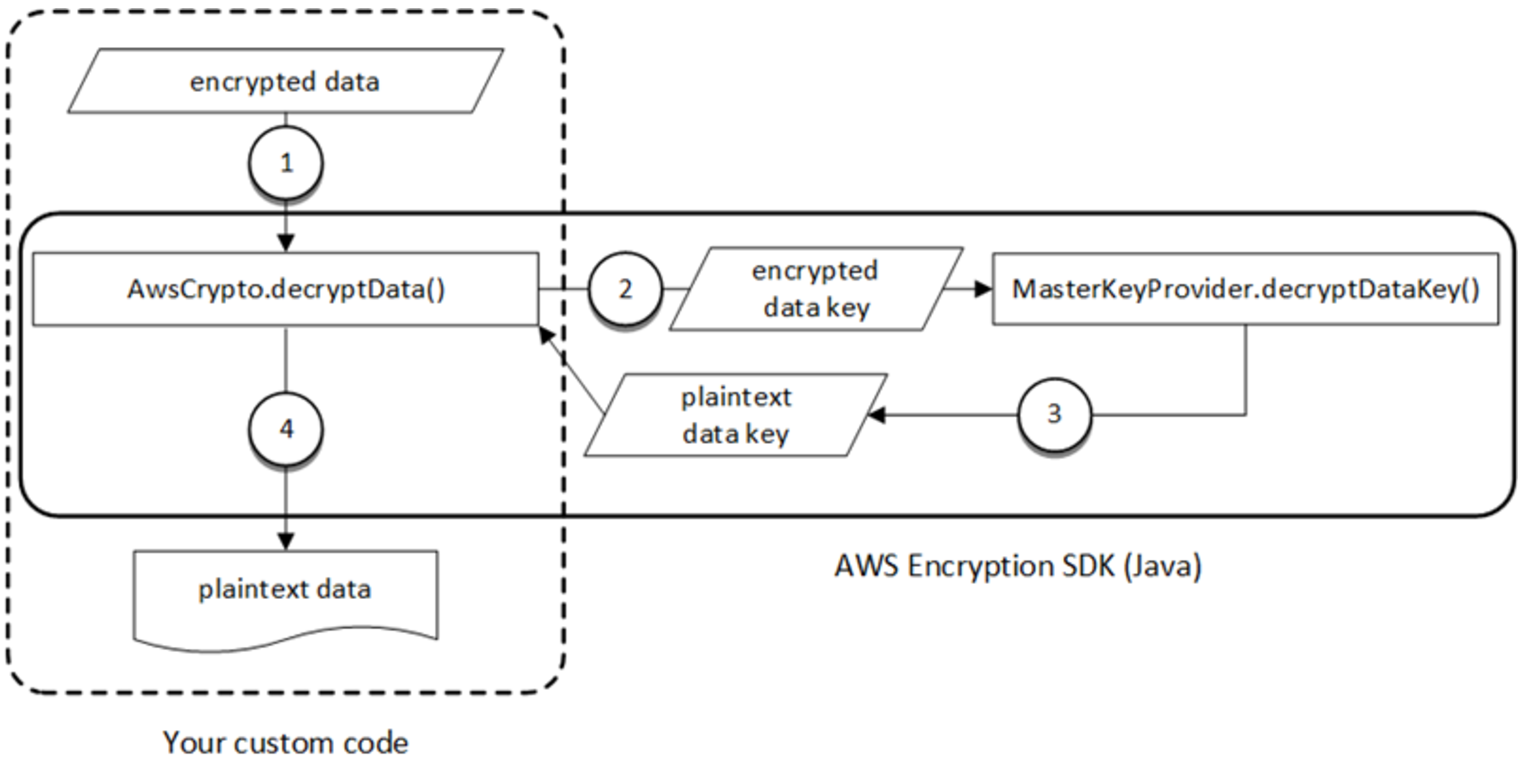
복호화 방식

Decryption

  1. 암호화된 문자열과 암호화된 Data Key를 복호화 메소드에 전달합니다.
  2. 암호화된 Data Key를 Master Key Provider에 전달합니다.
  3. Master Key Provider는 전달받은 암호화된 Data Key를 복호화하여 평문 Data Key를 반환합니다.
  4. 평문 Data Key를 이용하여 암호화된 문자열을 복호화하여 반환합니다. 복호화가 완료된 평문 Data Key는 삭제합니다.

이제부터 암복호화 API를 구축해 봅니다.

순서는 KMS Master Key를 생성하고 Lambda에서 암복호화 함수를 만들고 마지막으로 API Gateway에 Lambda를 연결해주고 테스트하면 끝납니다. 참 쉽죠~

KMS Master Key 생성

AWS관리 콘솔에 로그인합니다. 그리고 KMS라는 서비스가 있어야 하는데… 어랏 보이지 않습니다만,
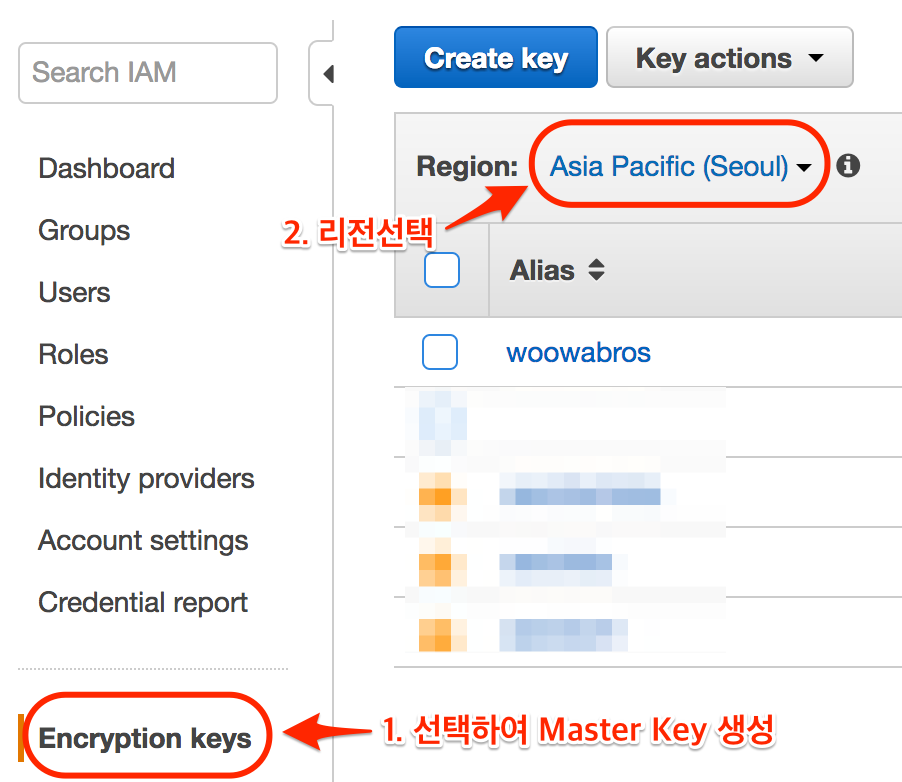
고객님, 그땐 당황하지 마시고 IAM을 선택하고 진행하면 됩니다(메뉴조차 비밀스럽습니다). IAM 화면 좌측 메뉴 하단에 “Encryption Keys”를 클릭한 뒤 서울 Region을 먼저 선택하고 “Create Key”를 눌러 생성하면 됩니다. 시스템 관리자 권한으로 접근하여 생성할 수 있습니다.

Create KMS Marter Key

암복호화 Lambda 함수 만들기

Lambda 함수는 Python, NodeJs, Java가 지원됩니다(2016년 6월 시점). 우아한형제들에서는 Python을 사용해 구축했습니다.

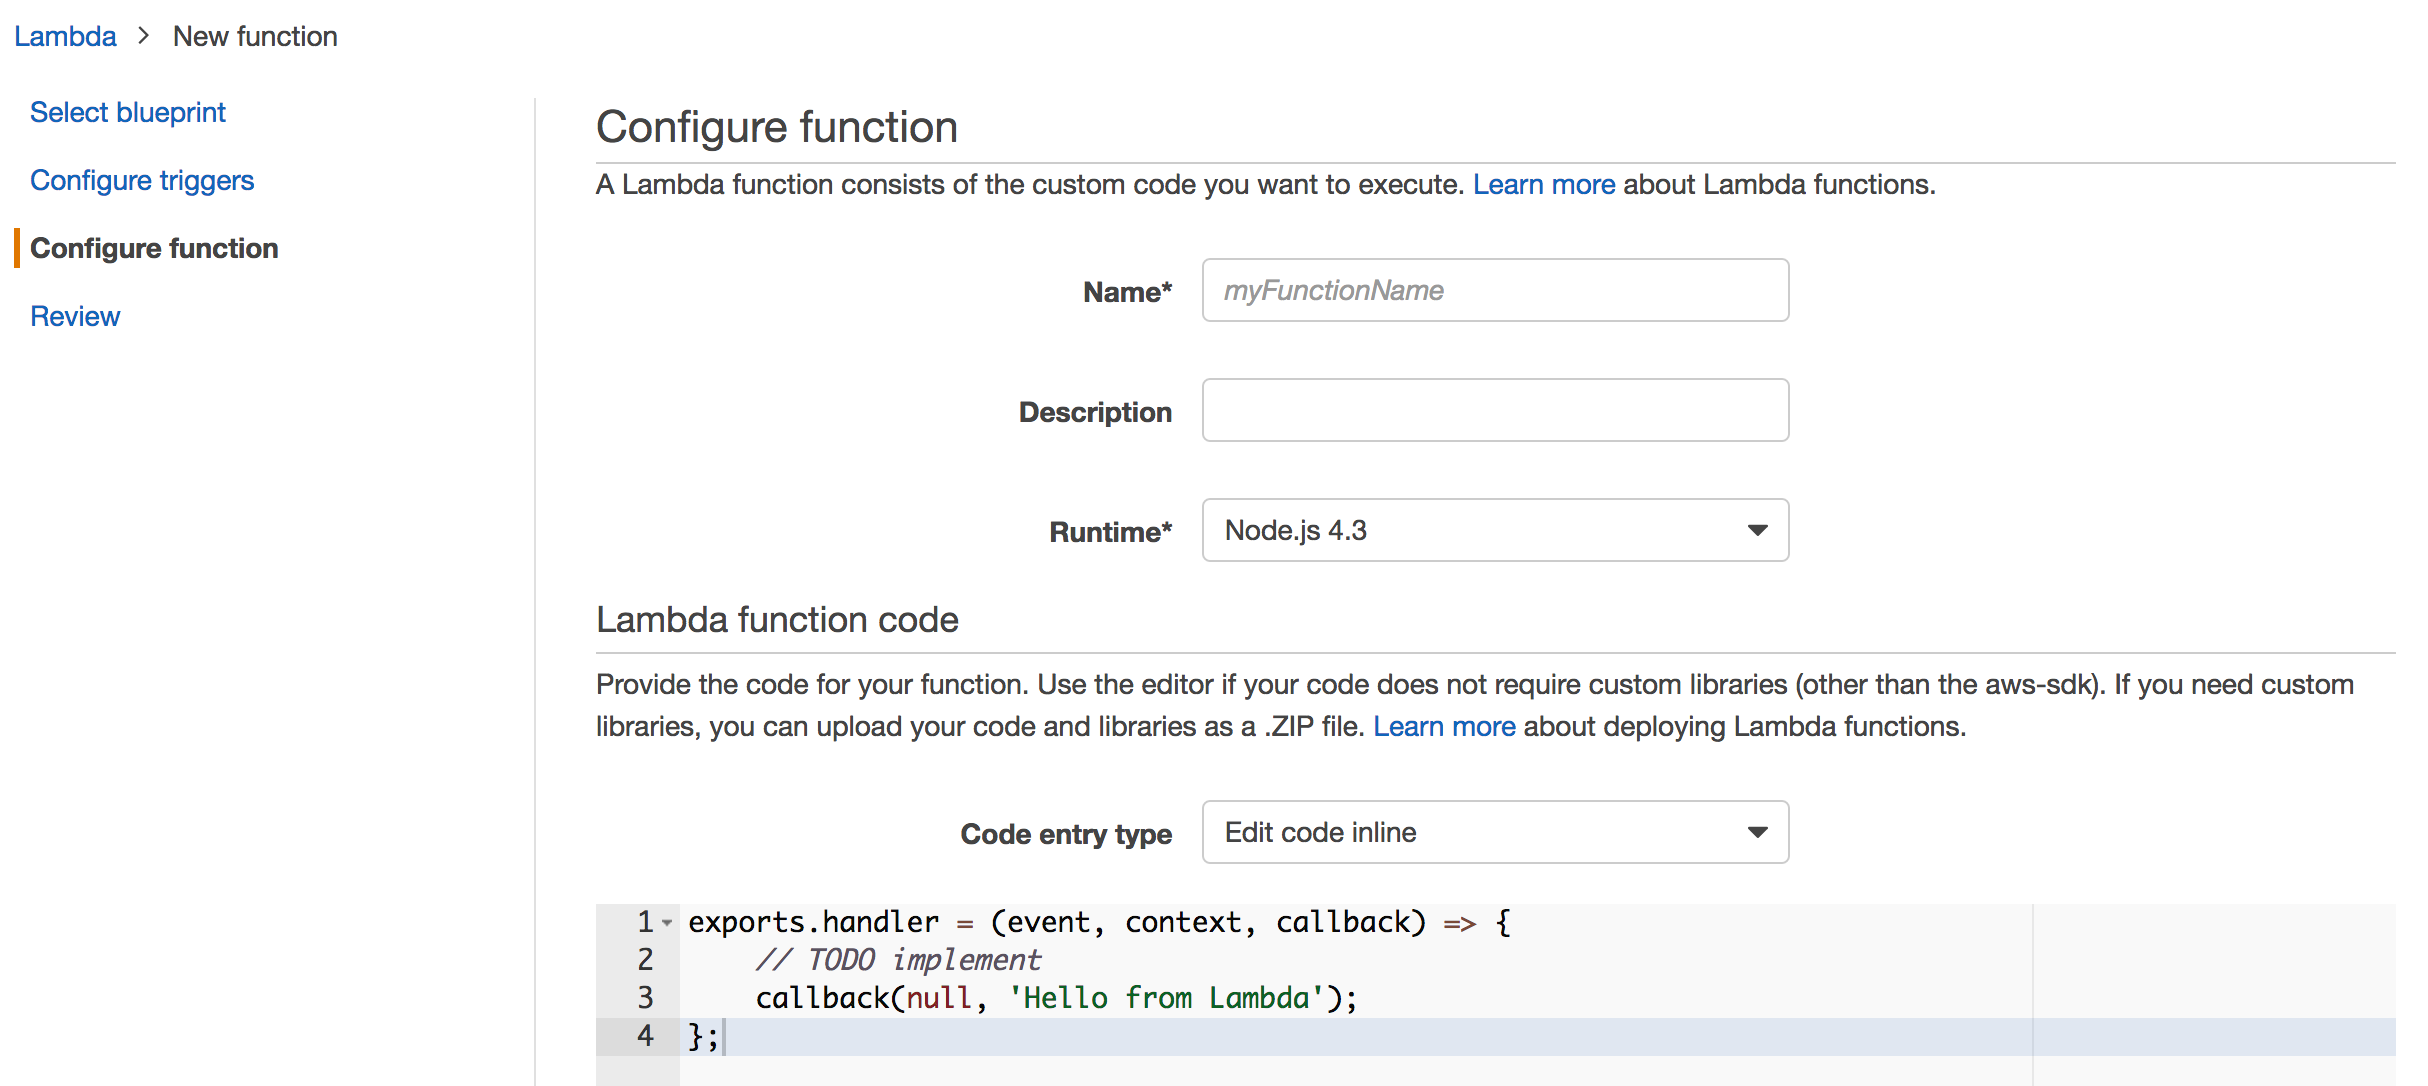
Lambda 서비스를 선택한 뒤 “Create a Lambda function” 버튼을 클릭, 다음 화면에서 좌측 메뉴 “Configure function”을 선택하면 Lambda 함수를 설정할 수 있는 화면이 나타납니다.Lambda Configure function


본격적으로 함수 구현 스타트~

라이브러리와 변수 초기화

import base64
import boto3

from Crypto.Cipher import AES

self.client = boto3.client('kms')

Boto3는 AWS에서 제공하는 Python용 SDK로 Low-level에 직접 접근할 수 있을 뿐 아니라 사용하기 쉬운 객체 지향 API를 제공합니다.

Key Id 발급 및 Data Key 생성

self.key_id = 'arn:aws:kms:ap-northeast-2:123456789012:key/{Master Key}'

self.pad = lambda s: s + (32 - len(s) % 32) * ' '

# data key 생성
data_key = client.generate_data_key(KeyId=self.key_id, KeySpec='AES_256')
self.plaintext_key = data_key.get('Plaintext')
self.ciphertext_blob = data_key.get('CiphertextBlob')

Master Key를 이용하여 Lambda class 로드 시, 암복호화에 필요한 Data Key(plaintext_key, ciphertext_blob)를 초기화합니다.

암호화 메소드

def encrypt_data(self, plaintext_message):
  crypter = AES.new(self.plaintext_key)
  encrypted_data = base64.b64encode(crypter.encrypt(self.pad(plaintext_message)))

  return encrypted_data, self.ciphertext_blob

평문 Data Key를 이용하여 암호화 객체를 생성, 문자열을 암호화하고 base64로 인코딩 후 이미 생성된 암호화된 Data Key(ciphertext_blob)와 함께 반환합니다. 이때 반환되는 암호화된 Data Key는 복호화에 필요한 평문 Data Key를 얻기 위해 꼭 필요한 정보이므로 어플리케이션에서 관리되어야 합니다.

복호화 메소드

def decrypt_data(self, encrypted_data, ciphertext_blob):
  decrypted_key = self.client.decrypt(ciphertext_blob).get('Plaintext')
  crypter = AES.new(decrypted_key)

  return crypter.decrypt(base64.b64decode(encrypted_data)).rstrip()

전달 받은 암호화된 문자열(encrypted_data)과 Data Key(ciphertext_blob)로 평문 Data Key를 반환 받아 암호화 역순으로 암호화된 문자열을 base64로 디코딩한 뒤 복호화해서 반환합니다.

lambda_handler 구현

def lambda_handler(req_type, context):
  try:
    # TODO implement
  except Exception as e:

어플리케이션에서 요청(req_type)한 유형에 따라 위 구현 메소드를 수행할 처리 로직 및 예외상황에 대해 구현해 줍니다.

마지막으로 API Gateway 설정하여 Lambda와 연결

AWS Lambda에서 구현한 함수 실행을 위해 API를 생성하고 설정합니다.
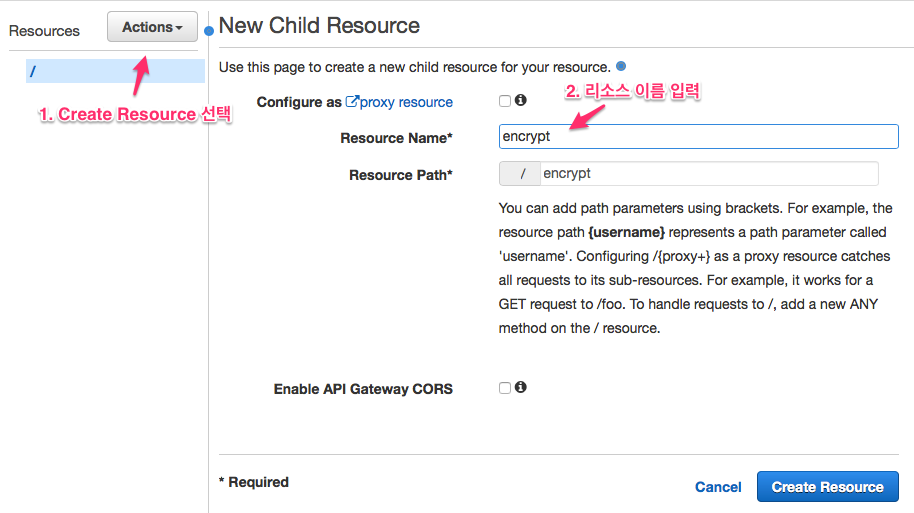
API 리소스 생성을 위해 “Create API”를 버튼을 클릭한 뒤 “Actions”의 Create Resource를 선택해 이름을 지정하고 생성합니다.

create_resource


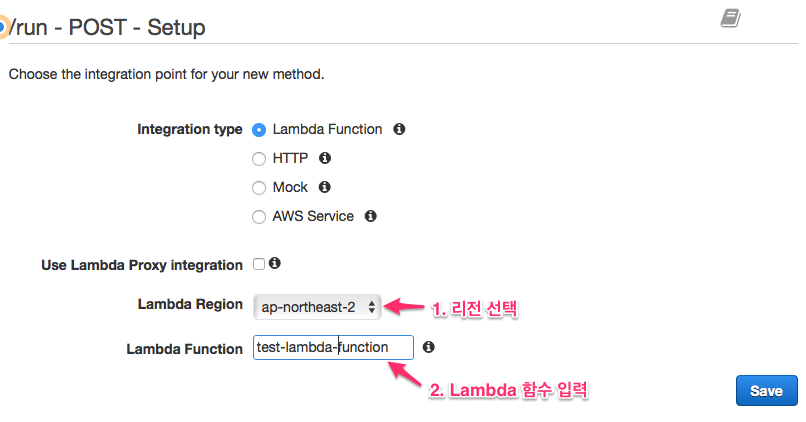
Rest 메소드 추가하기 위해 다시 “Actions”의 Create Method를 통해 리소스에 연결될 HTTP 메서드(예: POST)를 선택한 뒤 Region과 이미 생성해 놓은 Lambda 함수를 지정합니다.

create method


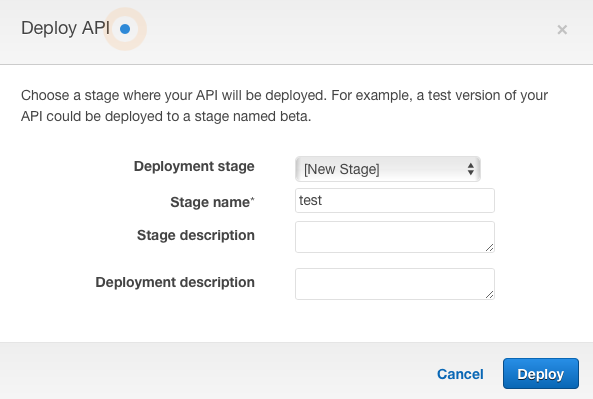
API 배포를 위해 생성한 메소드에서 “Actions”를 눌러 Deploy API를 선택합니다. 설정 화면에서 “[New Stage]”를 선택한 뒤 배포할 스테이지 정보(예: test, prod 등)를 입력합니다.

api Deploy


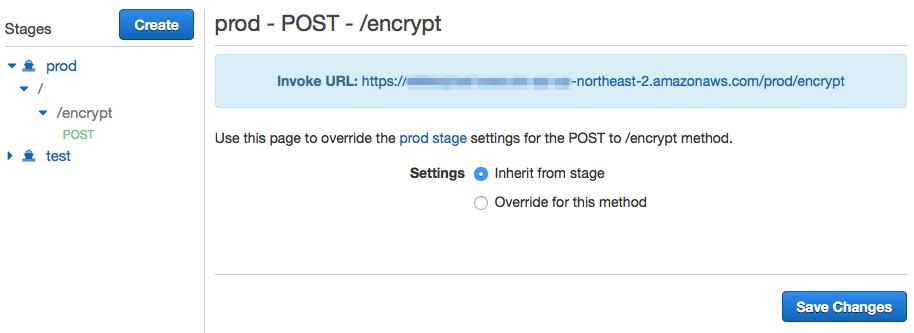
위 작업까지 완료됐다면 생성된 배포용 API 호출 URL을 확인할 수 있습니다.

invoke url


추가로 API 호출 시 메소드에 보안 설정을 구성하고 URL이 외부에 유출되더라도 불필요한 유입을 차단하도록 API Key를 설정할 수 있습니다.

API Key 설정

  • “Usage Plans”를 선택 후 임계치에 값을 설정하고 API Stage를 추가합니다.
  • “API Keys”를 선택한 뒤 “Actions”의 Create API Key를 선택하여 생성하고 Add to Usage Plan를 클릭하여, “Usage Plans”에서 생성한 Plan을 입력하여 설정합니다.
  • 설정이 완료된 API Key는 좌측 메뉴 “API Keys” 에서 확인 가능합니다.


자! 이제 모든 설정이 끝났으므로 암복호화를 테스트만 해보면 되겠네요.

curl -d '{"req_type":"encrypt","context":"암호화할 문자열"}' \
  -H "x-api-key : {API Key}" https://{API 호출 URL}/prod/encrypt

curl -d '{"req_type":"decrypt","context":"복호화할 문자열 + 복호화를 위한 암호화된 Data Key"}' \
  -H "x-api-key : {API Key}" https://{API 호출 URL}/prod/encrypt

아직 아쉬운 부분… Limit.

AWS에서 제공하는 대부분의 서비스들은 기본적으로 Limit이 존재합니다. 클라우드 서비스에서 리소스를 효율적으로 관리하기 위해 당연하겠지만, API Gateway, Lambda에 대해 거의 무제한으로 사용 가능한 다른 Region에 비해 서울 Region에서는 아직까진 계정당 최대 Limit이 제한되어 있어 트래픽이 많은 서비스를 구현하기엔 부담스럽다는 부분입니다.
Limit을 고려하지 않을 경우, 임계치에 도달하여 API가 정상적으로 동작하지 않거나 응답 속도를 보장 받을 수 없습니다. 따라서 상황에 따라 계정을 분리하여 사용하거나 AWS 서비스 도입 전 구축 서비스의 트래픽을 잘 가늠하여 진행하는 것을 권장합니다.

참고링크


Getting started with SQLite in C#

This tutorial will teach you how to create and connect to an SQLite database in C#. You will also learn how to create and modify tables and how to execute SQL queries on the database and how to read the returned results.

I’ll assume that you’re already familiar with SQL and at least have some knowledge of how it works (for example: what to expect as a result from “select * from table1” )

There will probably be two parts, with the first one discussing the basics needed to do pretty much anything, and in the second part I’ll discuss some miscellaneous subjects like how to parameterize your queries to make them much faster and safer.

Let’s get started.

Create a standard C# console project.

Since we’re working in C# we’ll be using the System.Data.SQLite library. This library is not a standard library (packaged with .NET for example) so we’ll need to download it. It is being developed by the people who’re also working on the (original) SQLite.

All you’ll need are two files, a .dll and a .xml file for some documentation. These files are available for download at the end of this article, you can also download these from their website, but you’ll also get some files that you don’t need.

Put these files in the folder of your project and add an assembly reference to the .dll. Just browse to System.Data.SQLite.dll and select it.

Now add using System.Data.SQLite; to the usings and you’re done. You’ve successfully added the SQLite library to you project!

Creating a database file:

You usually don’t need to create a new database file, you work with an existing one, but for those cases where you do need to create a brand new one, here’s the code:

1
SQLiteConnection.CreateFile("MyDatabase.sqlite");

Connecting to a database:

Before you can use the database, you’ll need to connect to it. This connection is stored inside a connection object. Every time you interact with the database, you’ll need to provide the connection object. Therefore, we’ll declare the connection object as a member variable.

1
SQLiteConnection m_dbConnection;

When creating a connection, we’ll need to provide a “connection string” this string can contain information about the… connection. Things like the filename of the database, the version, but can also contain things like a password, if it’s required.

You can find a few of these at: http://www.connectionstrings.com/sqlite

The first one is good enough to get our connection up and running, so we get:

1
2
3
m_dbConnection =
new SQLiteConnection("Data Source=MyDatabase.sqlite;Version=3;");
m_dbConnection.Open();

After we create the connection object, we’ll have to open it. And with every Open() there comes a Close(), so don’t forget to call that after you’re done with your connection.

Creating a table:

Let’s write some SQL now. We’ll create a table with two columns, the first one contains names and the second one contains scores. See it as a high scores table.

1
string sql = "create table highscores (name varchar(20), score int)";

You could also spam caps if you like and get something like this:

1
string sql = "CREATE TABLE highscores (name VARCHAR(20), score INT)";

Now we’ll need to create an SQL command in order to execute it. Luckily, we’ve got the SQLiteCommand class for this. We create a command by entering the sql query along with the connection object.

1
SQLiteCommand command = new SQLiteCommand(sql, m_dbConnection);

Afterwards, we execute the command. But before we execute our command, i’d like to mention that not all commands are the same, some commands return results (like SELECT etc.) and others don’t (like the one we just wrote) That’s why there are two execute methods (actually, there are three) One returns the actual results (the rows of the table) the other returns an integer indicating the number of rows that have been modified. We’ll use the last one now.

1
command.ExecuteNonQuery();

At this time, we’re not interested in the number of rows that have been modified (it’s 0) But you could imagine that it might be interesting to know this information in UPDATE queries.

Filling our table:

Let’s fill our table with some values, so we can do some SELECT queries. Let’s create a new command. We’ll see later that this process can be made a bit easier and faster with command parameters.

1
string sql = "insert into highscores (name, score) values ('Me', 9001)";

We create and execute the command the same way as we created the table. I added two more rows (or records) to the table. Here’s the code:

1
2
3
4
5
6
7
8
9
string sql = "insert into highscores (name, score) values ('Me', 3000)";
SQLiteCommand command = new SQLiteCommand(sql, m_dbConnection);
command.ExecuteNonQuery();
sql = "insert into highscores (name, score) values ('Myself', 6000)";
command = new SQLiteCommand(sql, m_dbConnection);
command.ExecuteNonQuery();
sql = "insert into highscores (name, score) values ('And I', 9001)";
command = new SQLiteCommand(sql, m_dbConnection);
command.ExecuteNonQuery();

As you can see, this is three times pretty much the same piece code. But it works!

Getting the high scores out of our database:

Let’s query the database for the high scores sorted on score in descending order. Our SQL query becomes: “select * from highscores order by score desc”

We create a command in the regular fashion:

1
2
string sql = "select * from highscores order by score desc";
SQLiteCommand command = new SQLiteCommand(sql, m_dbConnection);

However, we execute this command using a different method, we’ll use the ExecuteReader() method which returns an SQLiteDataReader object. We’ll use this object to read the results of the query.

1
SQLiteDataReader reader = command.ExecuteReader();

With this reader you can read the result row by row. Here’s some code that iterates trough all the rows and writes them to the console:

1
2
3
4
5
string sql = "select * from highscores order by score desc";
SQLiteCommand command = new SQLiteCommand(sql, m_dbConnection);
SQLiteDataReader reader = command.ExecuteReader();
while (reader.Read())
       Console.WriteLine("Name: " + reader["name"] + "\tScore: " + reader["score"]);

The Read() method of the reader moves the reader to the next row. With the [] operators, you can read the value of a certain column. The value returned is of the type object. So you’ll usually need to cast it before you can use it. Fortunately, you usually know what this type is.

Well, that’s about it for this tutorial. You should now be able to do pretty much anything you want with your database.

Click here to download the project files that implement what we’ve discussed in this article.

The above link also contains the libraries. If you’d like to have only the library, click the link below: The version of the library provided here is the .NET 4.0 x86 version. This should work fine for anyone working in Visual Studio 2010. If it doesn’t work, download the correct version from their website (mentiond at the beginning of this article)

Download only the libraries.


1. NLog Configuration 수동 등록하는 방법이다.

 (여러 라이브러리에 NLog를 사용하면 아래의 방법을 추천하지 않는다.)


// Step 1. Create configuration object 

var config = new LoggingConfiguration();


// Step 2. Create targets and add them to the configuration 

var consoleTarget = new ColoredConsoleTarget();

config.AddTarget("console", consoleTarget);


var fileTarget = new FileTarget();

config.AddTarget("file", fileTarget);


// Step 3. Set target properties 

consoleTarget.Layout = @"${date:format=HH\:mm\:ss} ${logger} ${message}";

fileTarget.FileName = "${basedir}/log/library/${shortdate}_dataflow.txt";

fileTarget.Layout = "${message}";


// Step 4. Define rules

var rule1 = new LoggingRule("*", LogLevel.Debug, consoleTarget);

config.LoggingRules.Add(rule1);


var rule2 = new LoggingRule("*", LogLevel.Debug, fileTarget);

config.LoggingRules.Add(rule2);


// Step 5. Activate the configuration

LogManager.Configuration = config;


2. NLog Configuration 에 수동으로 추가하는 방법이다.

기존의 설정을 초기화시키지 않고 추가할 수 있는 장점이 있다.


var consoleTarget = new ColoredConsoleTarget();

NLog.LogManager.Configuration.AddTarget("console", consoleTarget);


var fileTarget = new FileTarget();

NLog.LogManager.Configuration.AddTarget("file", fileTarget);


// Step 3. Set target properties 

consoleTarget.Layout = @"${date:format=HH\:mm\:ss} ${logger} ${message}";

fileTarget.FileName = "${basedir}/log/library/${shortdate}_stitch.txt";

fileTarget.Layout = "${message}";


// Step 4. Define rules

var rule1 = new LoggingRule("StitchLibrary", LogLevel.Debug, consoleTarget);

NLog.LogManager.Configuration.LoggingRules.Add(rule1);


var rule2 = new LoggingRule("StitchLibrary", LogLevel.Debug, fileTarget);

NLog.LogManager.Configuration.LoggingRules.Add(rule2);


'Knowledge > NLog' 카테고리의 다른 글

[.NET] NLog Event Register 콜백 이벤트  (0) 2018.04.14

* 구조 복사

Create Table new_table like old_table

  특징 : 기존 테이블의 설정 그대로 복사 된다.

    참고 ==> 큐브리드의 경우 복사하고자 하는 기존 테이블에 'Primary Key' 또는 'auto_increment' 가 설정 되어 있으면 복사 할 수 없음.

    응용 ==> Create Table IF NOT EXISTS new_table like old_table (new_table 이 없으면 복사)


* 구조와 데이터 복사

Create Table new_table ( select * from old_table )

  특징 : 테이블의 구조와 함께 데이터도 함께 복사가 된다.

     주의 ==> 큐브리드의 경우와 같이 기존 테이블에 'Primary Key' 또는 'auto_increment' 가 설정 되어 있으면

       해당 설정은 적용 되지 않고 값만 복사 됨.


* 데이터 복사

Insert Into destination_table ( select * form source_table)

  참고 ==> 대상 테이블의 컬럼 중에 자동 증가 값 설정 이 된 컬럼이 있을 경우 해당 컬럼에 데이터 입력시 중복된 데이터가 있으면 오류 발생.

  응용 ==> Insert Into destination_table (column_a, column_b) (select a, b from source_table) 원하는 필드의 데이터만 복사가 가능하다.


https://m.blog.naver.com/PostView.nhn?blogId=kilsu1024&logNo=110162891049&proxyReferer=https%3A%2F%2Fwww.google.co.kr%2F


My version of SQLite does not support the IF EXISTS operator. How can I drop a table which may or may not exist without getting an error slapped at me?

I can't update the version on a live application right now, so I cannot use a SQLite version that supports IF EXISTS.

    The official documentation says to use IF EXISTS, so I suspect your best plan is to upgrade.

    If you can't, you need to see whether you can do some trivial operation on the table that will succeed whether or not the table is empty; if it succeeds you should delete the table, if it fails the table is already gone. An example of the sort of operation to try might be:

    SELECT COUNT(*) FROM theTable;

    Note that you need to trap the possible error from this at the language level, and you might want to wrap the whole lot (probe, error-trap, drop table) in a transaction. Of course, the other approach if you're getting into error handling is to just drop the table and handle the error anyway.


    -


    The next link will bring you to a great tutorial, that helped me a lot!

    How to SQLITE in C#

    I nearly used everything in that article to create the SQLite database for my own C# Application.

    Don't forget to download the SQLite.dll, and add it as a reference to your project. This can be done using NuGet and by adding the dll manually.

    After you added the reference, refer to the dll from your code using the following line on top of your class:

    using System.Data.SQLite;

    You can find the dll's here:

    SQLite DLL's

    You can find the NuGet way here:

    NuGet

    Up next is the create script. Creating a database file:

    SQLiteConnection.CreateFile("MyDatabase.sqlite");
    
    SQLiteConnection m_dbConnection = new SQLiteConnection("Data Source=MyDatabase.sqlite;Version=3;");
    m_dbConnection.Open();
    
    string sql = "create table highscores (name varchar(20), score int)";
    
    SQLiteCommand command = new SQLiteCommand(sql, m_dbConnection);
    command.ExecuteNonQuery();
    
    sql = "insert into highscores (name, score) values ('Me', 9001)";
    
    command = new SQLiteCommand(sql, m_dbConnection);
    command.ExecuteNonQuery();
    
    m_dbConnection.Close();

    After you created a create script in C#, I think you might want to add rollback transactions, it is safer and it will keep your database from failing, because the data will be committed at the end in one big piece as an atomic operation to the database and not in little pieces, where it could fail at 5th of 10 queries for example.

    Example on how to use transactions:

     using (TransactionScope tran = new TransactionScope())
     {
         //Insert create script here.
    
         //Indicates that creating the SQLiteDatabase went succesfully, so the database can be committed.
         tran.Complete();
     }


    -


    Adicionando logs em Universal Apps &ndash; talkitbr.pdf


    링크: https://talkitbr.com/2015/06/11/adicionando-logs-em-universal-apps/


    + Recent posts